Implement a feature flag in your application
Learn the basics of how to implement feature flags in your code.
When you add a feature flag to a story in Atono, you'll also need to include it in your codebase. Below, we provide sample code that demonstrates how to reference the feature flag and the environment it applies to.
Our feature flags are based on OpenFeature, an emerging standard for feature flagging that supports multiple platforms. For additional information, you can explore the OpenFeature SDK documentation.
1. Install the SDK
Run the following command in your project directory to install the Atono SDK for the platform you are using:
Client-side applications
npm install --save @atono-io/web-sdkReact applications
npm install --save @atono-io/react-sdkVerify the installation
Run the following command to check that the installation was successful:
npm list @atono-io/web-sdkor
npm list @atono-io/react-sdk2. Add the flag to your code
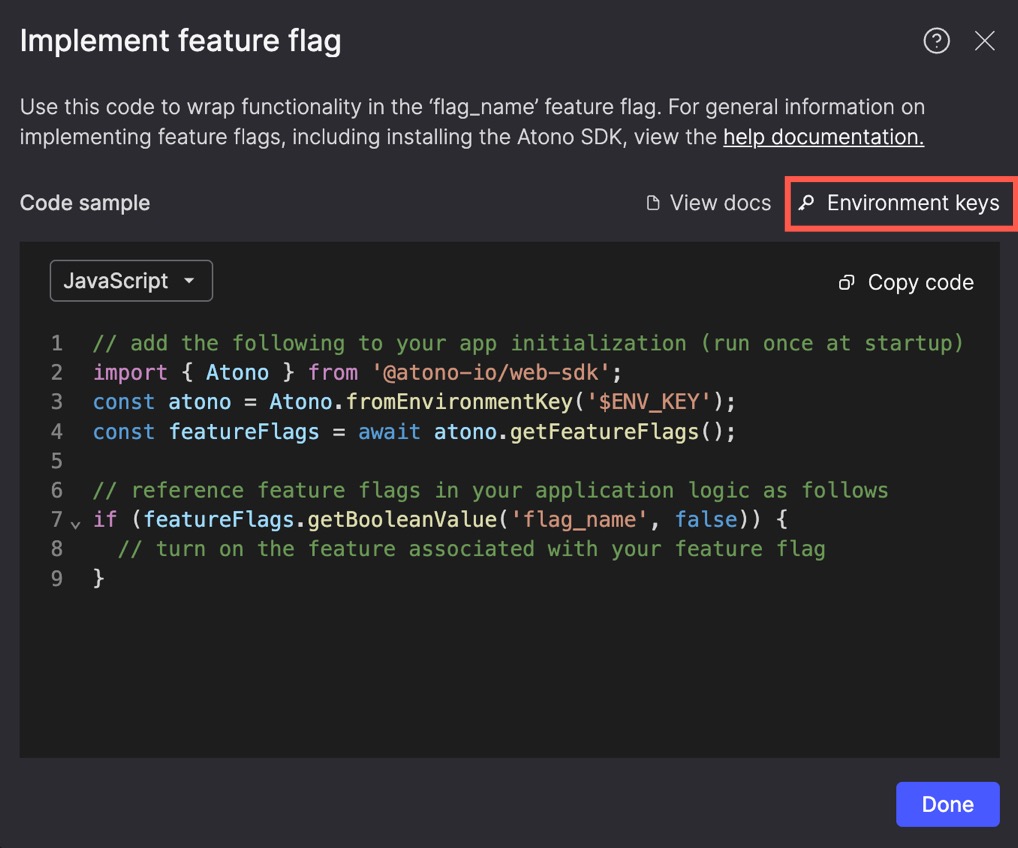
Once you add a feature flag to a story, Atono will generate the following sample code that demonstrates how to implement the flag in your application.
You can copy the code from the Implement feature flag dialog. Paste the sample code in your application and use it to wrap the functionality you want to control with the feature flag.
Client-side example
Select JavaScript as the language of the code sample.
// add the following to your app initialization (run once at startup)
import { Atono } = from ('@atono-io/web-sdk');
const atono = Atono.fromEnvironmentKey('$ENV_KEY');
const featureFlags = await atono.getFeatureFlags();

// reference feature flags in your application logic as follows
if (featureFlags.getBooleanValue('flag_name', false)) {
  // turn on the feature associated with your feature flag
}
React example
Select React as the language of the code sample.
With the React SDK, wrap your application in the <AtonoProvider> component and use the useFeatureFlag hook to query flags in child components.
Root component:
import { AtonoProvider } from '@atono-io/react-sdk';

function RootComponent() {
    return (
        <AtonoProvider environmentKey="<your-environment-key>">
            <ChildComponent />
        </AtonoProvider>
    );
}
Child component:
import { useFeatureFlag } from '@atono-io/react-sdk';

function ChildComponent() {
    const isAmazingFeatureEnabled = useFeatureFlag()
        .getBooleanValue('flag_name', false);

    return isAmazingFeatureEnabled
        ? <div>Amazing feature is enabled 😎</div>
        : <div>Amazing feature is not available 🙅</div>;
}
The React SDK automatically provides access to feature flags to any component wrapped in <AtonoProvider>.
3. Reference your environment key
Next, you'll need to replace the $ENV_KEY or <your-environment-key> placeholder in the sample code with a reference to the environment variable that stores the environment key from Atono.
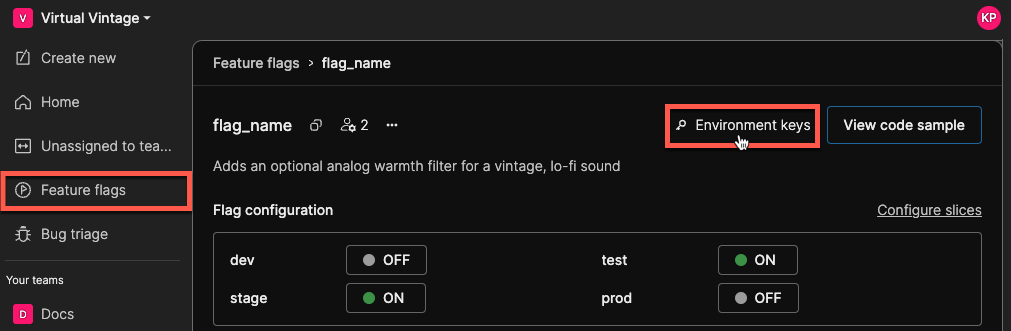
You can access your workspace's environment keys by clicking Environment keys in the Implement feature flag dialog or on the flag configuration screen:
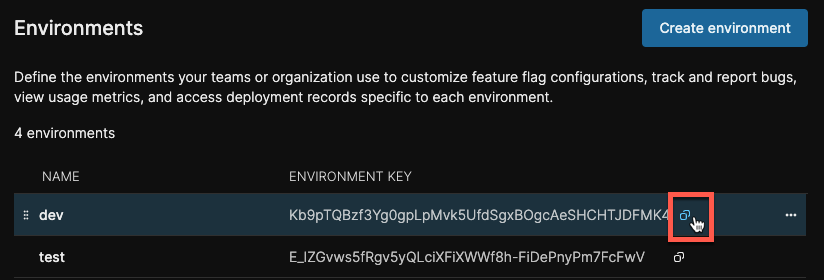
This will take you to the Environments page, where you can click the copy icon next to an environment to copy its key to your clipboard.
4. Customer and Location context
For some applications, you may need to provide additional context when evaluating feature flags, such as customer or location. The way this context is handled differs between the client-side and server-side SDKs.
Client-side SDK
In the client-side SDK, location is automatically fetched and set by the SDK during initialization, so you don't need to manually set it. This simplifies cases where the user's location is relevant for flag evaluation.
However, for other context variables, like customer, you can manually set the context:
import { Atono } = from ('@atono-io/web-sdk');

const atono = Atono.fromEnvironmentKey('$ENV_KEY');
const featureFlags = await atono.getFeatureFlags();

// Set the customer context for this specific flag evaluation
await featureFlags.setContext({ customer: 'Virtual-Vintage' });

const amazingFeatureEnabled = featureFlags.getBooleanValue('amazing_feature_enabled', false);

if (amazingFeatureEnabled) {
    console.log('Amazing feature is enabled 😎');
}
Since the user or location context doesn’t change often on the client-side, you only need to set this once when initializing the SDK.
React SDK
Set the evaluation context when configuring the <AtonoProvider> in your Root component:
import { AtonoProvider } from '@atono-io/react-sdk';

function RootComponent() {
    const flagEvaluationContext = { customer: 'Virtual-Vintage' };

    return (
        <AtonoProvider
            environmentKey="<your-environment-key>"
            evaluationContext={flagEvaluationContext}
        >
            <ChildComponent />
        </AtonoProvider>
    );
}
Server-side SDK
On the server-side, because different requests can come from different users, the evaluation context needs to be passed dynamically with each request.
Here's an example of how you might pass the context for a flag evaluation:
const { Atono } = require('@atono-io/server-sdk');

const atono = Atono.fromEnvironmentKey('$ENV_KEY');
const featureFlags = await atono.getFeatureFlags();

const evaluationContext = featureFlags.makeEvaluationContext({ customer: 'Virtual-Vintage' });
const amazingFeatureEnabled = featureFlags.getBooleanValue('amazing_feature_enabled', false, evaluationContext);

if (amazingFeatureEnabled) {
    console.log('Amazing feature is enabled 😎');
}
You can optimize how to handle this evaluation context, depending on your application architecture. For example, you may want to cache the context for a session or create a new one for each request.
What about React server-side rendering?We don't currently offer a React server-side SDK. If this is something you'd find valuable, share your thoughts with us in the #enhancements channel in the Atono Slack community!
SDK resilience and fallback behavior
Our feature flag system is designed with multiple fallback mechanisms to ensure your application continues running—even if it temporarily loses connection to Atono.
Configuration snapshot on initialization
When your application starts, the SDK fetches a snapshot of all feature flags and slices. This snapshot is stored in memory and used for all evaluations, so flag checks happen locally and don’t require live communication with Atono.
If the SDK can’t retrieve the snapshot at startup—or if your application evaluates a flag that doesn’t exist in the workspace—it returns the fallback value you’ve defined in your code. For example, in the line below, false means the feature is OFF by default:
featureFlags.getBooleanValue('amazing_feature_enabled', false);Polling for configuration updates
After initialization, the SDK polls for updated flag configurations at a regular interval (every 5 seconds). When a new configuration is available, it automatically replaces the previous one.
Evaluation event reporting
Each time a flag is evaluated, the SDK queues an event to report back to Atono. These events are used for:
- “Last evaluated” timestamps shown in the flag list
- Slice customer suggestions
Events are posted to Atono on a regular interval. If Atono is temporarily unreachable, the SDK continues to queue events and sends them when the connection is restored. If the application shuts down before events are posted (e.g., when a user closes a browser tab), those events may be lost. This does not affect flag evaluation.