Atono MCP Server
Connect your AI tool to Atono to create, update, and manage work without leaving your editor.
The Atono MCP server connects AI development tools—such as Cursor, Claude, or VS Code—to your Atono workspace. Once connected, your AI tool can read and update Atono data, including stories, bugs, workflow steps, and timeboxes, using your authenticated workspace access.
The server runs locally using Docker and communicates with your AI tool through the Model Context Protocol (MCP).
Overview
Once connected, your AI tool can use Atono data in real time—not just to look things up, but to help manage work across your teams. It understands your workflows, steps, and items, and can take action when you ask.
Here are a few examples of what that looks like in practice:
Stories:
- “Add a story for the API team to paginate search results and assign it to Max.”
- The AI finds the right team and user, creates the story with a user story statement and acceptance criteria, and assigns it.
- “Move STORY-123 to Development and assign it to Sam Taylor."
- It updates the story's workflow step and assigns it.
- "Review the acceptance criteria in STORY-456 and suggest improvements."
- The AI retrieves the story, reviews the criteria, and proposes changes. When you're ready, it can apply them directly.
Bugs:
- "Log a bug for the login timeout issue affecting production and assign it to the backend team. "
- The AI creates the bug with a summary, reproduction steps, expected and actual behavior, and applies the team and environment.
- "Fix BUG-789 and move it to Test once done.”
- After applying the fix, the AI moves the bug to Test and adds a plain-English summary of the change to the bug description.
Epics:
- "Create an epic for the Q3 checkout redesign and add STORY-101, STORY-104, and STORY-110 to it."
- The AI creates the epic, adds the listed stories, and confirms the result.
- "What's the status of EPIC-12?"
- The AI retrieves the epic and summarizes its stories, their workflow steps, and what's left to do.
- "Rewrite the user story statements on EPIC-12 to reflect the new persona we're targeting."
- The AI replaces the epic's user story statements with the updated set.
Subtasks:
- "Break STORY-456 into subtasks for the frontend and backend work."
- The AI creates subtasks on the story, one per piece of work.
- "Mark the backend subtask on STORY-456 as done and assign the frontend one to Priya."
- The AI updates the relevant subtasks' workflow step and assignee.
Linked items:
- "Link STORY-101 to BUG-202."
- The AI creates a link between the two items so they appear as related in the Atono UI.
Timeboxes:
- "What's planned for the Q2 launch timebox?
- The AI retrieves all stories and bugs in the timebox and summarizes what's included, their workflow steps, and team assignments.
AI context:
-
"Check the design decisions on STORY-456 before we start implementation."
- The AI retrieves the DESIGN context recorded during authoring—rationale, tradeoffs, and scoping choices—so implementation stays aligned with the original product intent.
-
"Check the investigation notes on STORY-456 and continue from there."
- The AI retrieves research and findings saved from previous work on the story and uses them to recommend next steps.
-
"Check the change summary on BUG-789 and suggest what still needs to be done."
- The AI retrieves a record of implementation changes already made, so it can continue work without duplicating or conflicting with what's been already been done.
Other:
- "Does 'timebox' mean the same thing as 'sprint' in our glossary?"
- The AI checks the glossary and confirms the defined term, helping keep terminology consistent in stories, bugs, and documentation.
- "Write release notes for STORY-45, STORY-52, and STORY-73."
- The AI retrieves each story, summarizes their acceptance criteria and outcomes, and drafts release notes that describe what changed and why.
Together, these actions use Atono MCP tools—the individual commands your AI assistant can call to read or update data in your workspace.
Quick start
To connect your AI tool to Atono:
- Install Docker Desktop and make sure it's running.
- Get your Atono API key.
- Add the Atono MCP server to your AI tool.
- Restart your AI tool.
- Confirm it's connected.
You only need to set this up once per tool. Updates to the MCP server are applied automatically when your AI tool restarts. For more details, see Updating the Atono MCP server.
The sections below walk through each step in more detail, including how to install Docker, retrieve your API key, and configure your specific AI tool.
Prerequisites
Before you begin, make sure you have the following:
1. Docker Desktop (version 27.0 or later)
Used to run the Atono MCP server locally.
Download at: https://www.docker.com/products/docker-desktop/
What is Docker?
Docker is the tool that runs the Atono MCP server on your computer. You don’t need to configure it—just install Docker Desktop and keep it running while you use your AI tool.
Check that it's installed (optional)
Run the following in your terminal (macOS/Linux) or command prompt (Windows). If Docker is installed correctly, you'll see a version number.
docker --versionDocker Desktop must be running in the background whenever you use the Atono MCP server. If your AI tool reports that it can't connect to the MCP server, check that Docker Desktop is open and running.
2. An Atono API Key
Used to authenticate your MCP server with your Atono workspace.
For instructions, see Manage API keys.
3. An MCP-enabled tool
Such as Claude Code, Cursor, VS Code, Windsurf, or GitHub Copilot.
Configuration
After you’ve installed Docker, retrieved your Atono API key, and confirmed that your AI tool supports MCP, you’re ready to connect it to your workspace.
Each client has its own way of adding an MCP server, but they all follow the same basic pattern:
- Point to the Atono MCP Docker image
- Provide your API key
- Restart the tool.
You’ll find setup details for several popular tools below. If yours isn’t listed, start with the General example and refer to your tool’s documentation for the specific configuration format it requires.
General
Most MCP-enabled tools include an “Add MCP Server” dialog or allow you to edit a small JSON configuration file.
{
  "atono": {
    "command": "docker",
    "args": [
      "run",
      "--pull=always",
      "-i",
      "--rm",
      "-e",
      "X_API_KEY",
      "atonoai/atono-mcp-server:latest"
    ],
    "env": {
      "X_API_KEY": "YOUR_ATONO_API_KEY"
    }
  }
}
Notes:
- command — the program used to launch the server (Docker).
- args — the parameters passed to Docker to run the container.
- env — environment variables passed to the container, including your API key.
Some tools may use slightly different field names—for example:
serverUrlorurl(for HTTP connections instead of command-based ones)headersinstead of env for authentication tokens
Claude Code
- Run the following command in your terminal:
claude mcp add --transport stdio atono \
  --env X_API_KEY=YOUR_ATONO_API_KEY \
-- docker run --pull=always -i --rm -e X_API_KEY atonoai/atono-mcp-server:latest- Replace
YOUR_ATONO_API_KEYwith your API key. - Run
/mcpin a Claude Code session to confirm that "Atono" appear in the list of servers.
For more details, see Claude Docs on Installing MCP servers.
Claude Desktop
- Go to Settings > Developer > Local MCP Servers > Edit config.
- Open the Claude configuration file: claude_desktop_config.json.
- Add the Atono MCP server configuration:
If the file is empty, copy and paste the following:
{
  "mcpServers": {
    "atono": {
      "command": "docker",
      "args": [
        "run",
        "--pull=always",
        "-i",
        "--rm",
        "-e",
        "X_API_KEY=YOUR_ATONO_API_KEY",
        "atonoai/atono-mcp-server:latest"
      ]
    }
  }
}
If the file already has other settings, add the mcpServers section (with a comma after the previous section):
{
  "existingSettings": "...",
  "mcpServers": {
    "atono": {
      "command": "docker",
      "args": [
        "run",
        "--pull=always",
        "-i",
        "--rm",
        "-e",
        "X_API_KEY=YOUR_ATONO_API_KEY",
        "atonoai/atono-mcp-server:latest"
      ]
    }
  }
}
- Replace
YOUR_ATONO_API_KEYwith your API key. - Save the file and restart Claude Desktop.
- If you return to Settings > Developer > MCP servers > Edit config, you should see
atonolisted. - Start a new chat and ask a question, such as "What Atono MCP tools are available?" You should see a list of the tools that allow Claude Desktop to manage your Atono workspace.
- When you next ask a question that requires workspace context (for example, "Find BUG-456 in Atono"), Claude will detect the Atono MCP server and prompt you to allow access —Always allow or Allow once. You might see this prompt again when using other tools.
Cursor
One-step install
If you're using Cursor, click the button below to install the Atono MCP server. Cursor loads the configuration automatically—no JSON editing required.

If you'd prefer, you can also install Atono from the official Cursor MCP directory.
Once installed, the server appears under Tools & MCP, and Cursor can use it to read and update Atono data when you ask.
Manual configuration
- Go to Cursor > Settings > Cursor Settings.
- On the Settings page, in the side menu, click Tools & MCP.
- Click Add Custom MCP. This opens the mcp.json file.
- Add the following:
{
  "mcpServers": {
    "atono-mcp-server": {
      "command": "docker",
      "args": [
        "run",
        "--pull=always",
        "-i",
        "--rm",
        "-e",
        "X_API_KEY=YOUR_ATONO_API_KEY",
        "atonoai/atono-mcp-server:latest"
      ]
    }
  }
}- Replace
YOUR_ATONO_API_KEYwith your API key. - Save the file and return to the Cursor Settings page. You should see the
atono-mcp-serverlisted and enabled. - Click the "# tools enabled" text under the server name to view its available tools.
OpenAI Codex
Codex supports MCP servers via a configuration file stored at ~/.codex/config.toml.
- Add the following to your file:
[mcp_servers.atono]
command = "docker"
args = ["run", "--pull=always", "-i", "--rm", "-e", "X_API_KEY", "atonoai/atono-mcp-server:latest"]

[mcp_servers.atono.env]
X_API_KEY = "Place your API Key here"- Replace
YOUR_ATONO_API_KEYwith your API key.
Codex automatically starts the Atono MCP server when you open a session that references it.
For more details, see OpenAI's Model Context Protocol documentation.
VS Code (GitHub Copilot)
- Open the Copilot Chat panel in VS Code.
- Click the Configure Tools (tools) icon next to the model selector.
- In the Configure Tools dialog, click the Add MCP Server (plug) icon to open a list of connection types.
- Select Docker Image.
- When prompted, enter the Docker image name:
atonoai/atono-mcp-server:latest- Press Enter.
- When asked to confirm, click Allow.
- When prompted to enter the Server ID, leave the default value (
atono-mcp-server) and press Enter. - Choose where to install the server:
- Workspace - adds the connection for your current project only (recommended).
- Global - makes the connection available in all VS Code workspaces.
- When prompted to trust the server, click Trust.
- When the
.vscode/mcp.jsonfile opens, add the following:
{
  "mcpServers": {
    "atono-mcp-server": {
      "command": "docker",
      "args": [
        "run",
        "--pull=always",
        "-i",
        "--rm",
        "-e",
        "X_API_KEY=YOUR_ATONO_API_KEY",
        "atonoai/atono-mcp-server:latest"
      ]
    }
  }
}
- Replace
YOUR_ATONO_API_KEYwith your API Key. - In the **MCP Servers **panel, click the Restart (restart) icon next to atono-mcp-server to apply your changes.
- When prompted again, click Trust.
- In Copilot Chat, type like: "What is my Atono configuration?"
- When Copilot asks to the the Atono MCP server, click Allow.
Windsurf
- Go to Windsurf > Settings > Windsurf settings.
- On the Settings page, to Cascade > MCP Servers, and click Open MCP Marketplace.
- Click the Settings (gear) icon from Windsurf’s MCP Marketplace, to automatically open the
mcp_config.jsonfile in your editor. - Add the following:
{
  "mcpServers": {
    "atono-mcp-server": {
      "command": "docker",
      "args": [
        "run",
        "--pull=always",
        "-i",
        "--rm",
        "-e",
        "X_API_KEY=YOUR_ATONO_API_KEY",
        "atonoai/atono-mcp-server:latest"
      ]
    }
  }
}- Replace
YOUR_ATONO_API_KEYwith your API Key. - Save the file and restart Windsurf.
- If you return to your list of MCP servers, you should now see the custom atono-mcp-server listed and enabled. Click the server to view its available tools.
Check that it's working
- Open your AI too.
- Start a new chat or session.
- Ask, "What Atono MCP tools are available?"
- Allow access if prompted.
Your tool should provide a list of Atono tools.
Docker Desktop must be running in the background whenever you use the Atono MCP server. If your AI tool reports that it can't connect to the MCP server, check that Docker Desktop is open and running.
Updating the Atono MCP Server
When a new version of the Atono MCP Server is released, no manual steps are required.
To update:
- Close your AI tool.
- Make sure Docker is running.
- Reopen your AI tool.
Your MCP configuration uses --pull=always, so Docker automatically downloads the latest version when the server starts.
If you want to check available versions or confirm the latest release, you can view the Atono MCP server on Docker Hub.
Available tools
See Atono MCP tools.
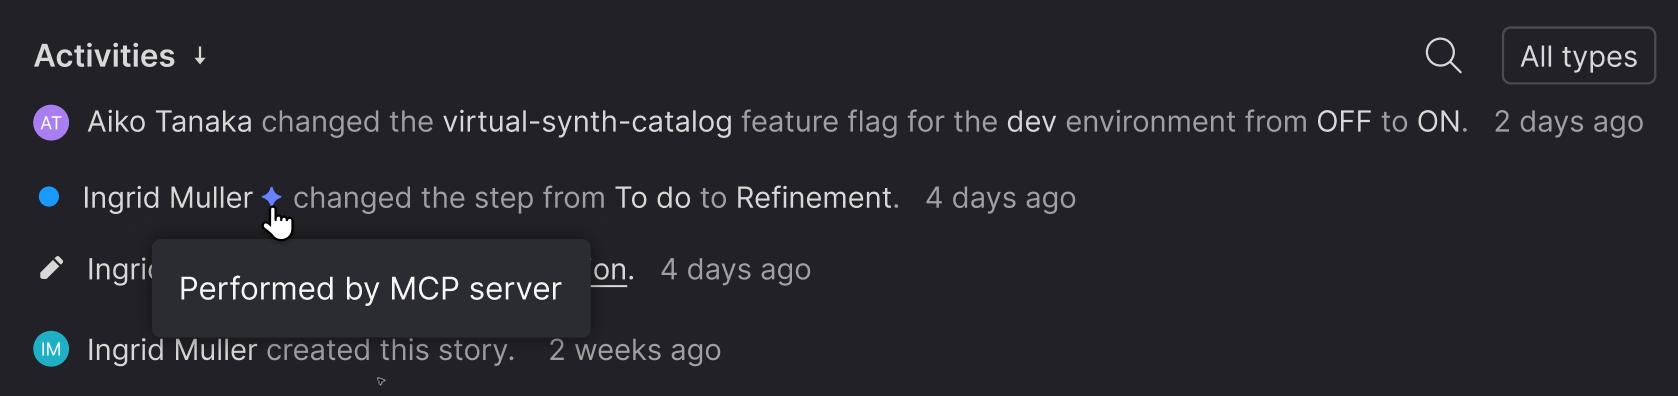
Tracking AI-performed actions
When the Atono MCP server performs actions on behalf of a user—such as creating a story, moving it between workflow steps, or updating a bug—it marks those actions so they can be identified as being completed by the MCP server.
This marking allows Atono to record the action in the Activities view as Performed by MCP server, helping teams understand which updates came from AI-connected tools rather than direct user actions in the UI.
Stop or remove the server
Press Ctrl + C in your terminal to stop the server.
To remove the image completely:
docker rmi atonoai/atono-mcp-server:latestSecurity notes
- Treat your Atono API key like a password.
- Avoid committing keys to repositories or shared config files.
- The MCP server only exposes a limited set of actions defined by Atono and cannot access data outside your workspace. Some actions, such as updating acceptance criteria or moving items between workflow steps, modify Atono data directly and may not be reversible.
Variations across tools
MCP client implementations can differ slightly. Some tools currently support the configuration examples shown above, while others may use alternate field names such as url, type, or headers. Refer to your client’s documentation or example template when adding an MCP server configuration.
Atono will continue to maintain compatibility with standard MCP fields as the protocol matures.